Predict the flex/stiffness and weight of your ski, snowboard, kiteboard, wakeboard or similar, before you start building. It is very important step. Follow the guide.
Link to the ski and board simulator: https://www.junksupply.com/ski-calculator/
I suggest ski builders use https://soothski.com/ as a helping tool. Bending (EI) Stiffness Index numbers can be multiplied by 10 to get numbers comparable to Bending Stiffness for ski-calculator tool, but be careful, they can only be used as a guide and feel for how stiffness varies by design and is NOT 1 to 1 .
License key: MYJRZ-N95LP-83MJJ-TXUSN
Here is a splitboard simulation and design example PDF: splitboard simulate design example
Note: 3D view might have some issues some times, but the results should be valid.
———–
Advice: Before you start, try following to get a feel for the numbers. Simulate your wood core or any wood as it is, minimize Material weight, sidewall thickness and steel edges (set values not to zero ‘0’ as simulator cant handle it, set them to say 0.001. ). See how it feels in real life and what results the simulator is giving you. Now you have an idea about what the numbers mean.
Now try to take an existing board/ski. Measure it. Try to find some info on its core. Try to see from the sides the thickness of edges, the sidewalls and also the composites. Usually a triax composite of 650gms is about 0.6-0.8mm thick. Use this as a guideline and try to simulate and see the numbers. This will be a good start.
———–
In general:
For kiteboard/wakeboard: set edges width and thickness to 0.01
For skis/snowboard: set the edge width and thickness to the one specified in the edge spec.
For splitboard: set the edge width and thickness to 2 x (the one specified in the edge spec).
The simulator will also give you a hint about the stiffness of your ride: Soft, ‘Soft Medium’, Medium, ‘Medium Hard’, Hard or ‘Very Hard’.
Hint: Calculate your core density by weighing it, and dividing the weight by the volume.
Wood type parameters: http://www.wood-database.com/
Our Simulator is a simple tool created by combining several simulators done on ski-forums and kite-forums in a way so you can get good idea how simple parameters affect your rides stifness, while also estimating other parameters such as weight. The tool might seem a bit nerdy, however, read this guideline below, give the tool a try, and dont mind contacting us if it is unclear.
In general the Simulator should be used before you get your hands dirty. It is a simple tool that will help you to correctly design and test a pair of Skis, a snowboard, a kite/wakeboard or a longboard for mass (or how much it will weigh), stiffness (or how flexible it will be) and deflection.
I often hear from users that the numbers in the simulator are hard to relate to. Well, the proper way to use it and get related to the numbers to what they represent in real life is to take an existing ski/snb or any board that you have, and simulate it as accurate as possible. Once you do this, you have a reference point and you can use these numbers for any future design and simulation as a reference. This is the proper way to do it.
We will also show limitations and and the work-around of the Simulator tool.
—————–
Limitations of the Simulator tool:
1. Make sure you use the Effective length (the part actually touching the ground/water/trucks for flex simulations! The tool will include minor tip and tail compensation for the mass.
2. The tool will assume a symmetrical Layup. Same top and bottom composite fabric. This is why if you have asymmetrical layup, you can still manage, but you need to think a bit extra. If you e.g. only have one carbon stringer on top, in the tool you will get one on top and one on bottom (symmetrical). This is why you should divide the weight of your actual stringer in the tool with 2 (one on top and one on bottom with half weight).
3. The tool will automatically include a base / bottom sheet equivalent in thickness to the steel edges. If you design a kiteboards, set steel edges to 0, the base will be set to 0. Please add a corrective topsheet mass for the mass estimate. The stifness will not be greatly impacted.
4. If you have a asymmetrical layup, or need to include extra layers (stringers or so) of composite, then you need to separate your simulation in 2 or more simulations and study the impact by each one or find common parameters as follows,
- For combining 2 wood types, you can find common density and Young modulus by adding the density or Young modulus together and then weight dem by the contribution of each in percentage! if you use 50% Poplar and 50% Beech, then resulting Y modulus is simply 0.5*Y modulus for Poplar added to the 0.5*Y modulus of Beech.
- using mixed layers in layup, such as combination of carbon and glass: If you use a multi layer of different material, say one layer of carbon and one layer of glass, top and bottom, then it should be best to do weighted approach to find the common density and Y modulus parameter for the simulation like this,
Common Density = ((Density1 x Weight1)+(Denisty2 x Weight2)) / (Weight1 + Weight2)
Common Modulus= ((Modulus1 x Weight1)+(Modulus2 x Weight2)) / (Weight1 + Weight2)
——————————–
Below you will find a brief explanation in written and illustrations…
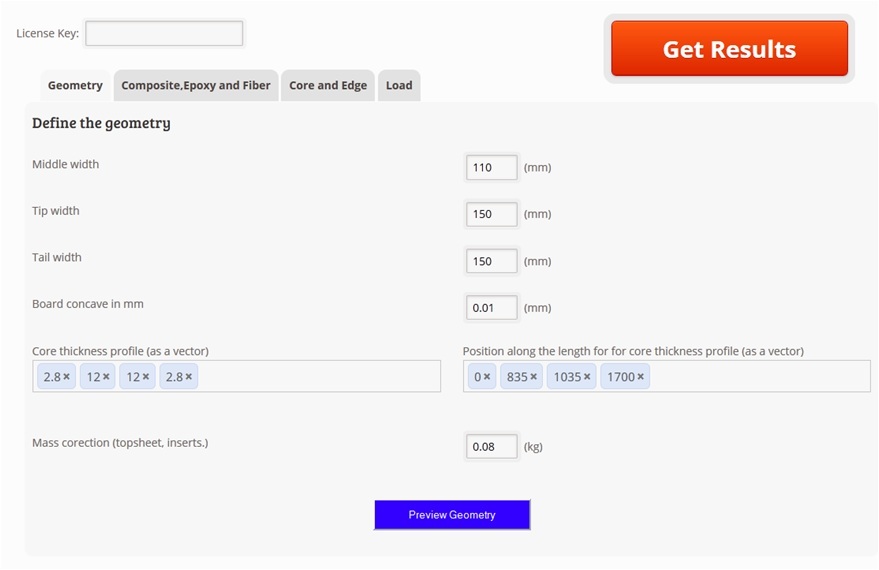
1. Define the Geometry
You need to input your core contour (total width of your core incl sidewalls etc., and how it contours) and your core profile (the thickness of your wood/other core).
1) Input your design width at the middle, tip and tail. This is the core contour (width).
2) Lets input the thickness. We define it as a vector, meaning a line of numbers along the length of the core. Input the effective length and thickness of your core, as multiple values of thickness vs. length along the core. In the figure Example below, the core thickness is tapered to 2.8mm at tip (0mm length), and 12mm at 835 to 1035mm of the length of the core (this is under foot for a ski), and then again 2.8mm at the tail, lenght of 1700mm.
If your design has a single concave, enter a value. Or if you have channals you can enter some value. The reason is that the channals and concave will increase the stiffness of the product, so this can be handy to get an idea.
The Mass Correction value is there to adjust your mass prediction if your design has a thick topsheet, many inserts and other factors not included by the tool.
Press ‘Preview Geometry’ to check your design.


2. Define the composite/the layup/epoxy and fabric.
The tool assumes simple symmetric layup of composite. Top and bottom composite layers will be same.
The tool assumes a triaxial layup, since this is the about the only right layup to use for best performance.
You need to define the weight of your fabric in each direction, see what is specified for the fabric you use, for +45 and -45 direction layer each and enter the value (it is assumed that +45 and -45 layer is same in weight, symmetrical), and also in the 0 direction.
Input the value in kg/m2 in 0 direction, then input the value for one of the +45 or -45 degree direction. If your fabric is 288g/m2 for 0 degree, input 0.288. If your +45 degree weight is 220g/m2, and -45 is also 220g/m2 (it is symmetrica), simply input 0.220 in the +-/45 degree field.
Then choose the properties density and Y modulus. (Carbon, glass, aramid etc,)
In ‘Advanced Perameters’ you can play with your epoxy and the ratio of your epoxy to fiber (This parameter is only used for mass estimate and is defined as: Total Fiber / (Total Fiber + Total Epoxy). This is not a necessary step for beginners.

3. Define the Core properties and the side materials.
Input your core density and modulus. The core can be any type as long as you have the correct values. If it is a mixed core, you can calculate an average density and Y modulus.
If you design a Ski or a SNB, you need to include the steel edges. The thickness and width. The most typical values are preset already.
Sidewall material is most usually ABS or UHMW-PE. You can input any other material as long as you have the values. The preset values are for UHMWPE.

4. Define the test case for the Deflection simulations
The ‘Load’ Tab is for you to set how the simulator will load your design. This will impact the deflection simulations. You can choose a
Uniform loading (load spread over the whole lenght of your product),
Center loading (all load is at the center of the product) or
Foot loading, where you define own own realistic loading. For this you input the load begins and load ends values. This load is applied symetrically around the center.
You need to set a Load magnitude in kg.
The Whole idea here is that you can do the same in practice with any other product, the same way and test how stiff it is, and use it as a guideline for all your future simulations!

5. Results
The main window will display all your set parameters so you can double check. ‘The design Flex is’ parameter will suggest the stiffness of your design. I once designed a very flexible kiteboard, it was too soft, and here the parameter was ‘Soft’ After that I adjusted the design and got Medium answer, it was what I wanted, so it helped me to get an idea if I am going in the right direction.
The 3D view will show your core.
Mass estimate will give you an approximate mass.
The achieved Deflection for the set load.
The stiffness values will be displayed in 2 parts:
1) the Maximum Stiffness. It is a theoretically calculated stiffness in N *mm^2
2) the Practical stiffness. This value is very usefull as you can do same measurement in practice on any ride you have, and this way you can have a design target.
The picture below illustrates a well balanced design that will fit most users. It is a design with medium stiffness. The red circle illustrates where majority of users would wish to end up, with a somewhat flexible design with peak practical stiffness ranging from 400-800N/mm (yellow area), from slight soft to medium or medium hard stiffness, depending on the user size, user level and application. Small individuals or not so heavy individuals or beginners enjoy more a soft ride(say stiffness of 350N/mm(kids) to 650N/mm(adult beginner)), average user would benefit from more medium flex (500-750N/mm) while heavy or experienced riders can go to more harder stiffness 700+N/mm.

How the practical Stiffness is calculated and how you can do it your self in practice?

In this example a Ski is fixed to a solid object. The Ski is than loaded by a weight, 10cm away from the fixation point. The deflection is measured and the stiffness (N/mm) can be calculated as the force (gravity * weight in kg) divided by the deflection value in mm.
This is the stiffness in this 1 point. Now you move the fixation point by few cm and repeat the process. Calculate the new stiffness value. Repeat this for the whole length of your ride to get stiffness in each point. The weight used here is the one specified in the Load field.